Thứ Tư, 14 tháng 10, 2009

The band pass filter


A band-pass filter is a device that passes frequencies within a certain range and rejects (attenuates) frequencies outside that range. An example of an analogue electronic band-pass filter is an RLC circuit (a resistor–inductor–capacitor circuit). These filters can also be created by combining a low-pass filter with a high-pass filter.[1]

Bandpass is an adjective that describes a type of filter or filtering process; it is frequently confused with passband, which refers to the actual portion of affected spectrum. The two words are both compound words that follow the English rules of formation: the primary meaning is the latter part of the compound, while the modifier is the first part. Hence, one may correctly say 'A dual bandpass filter has two passbands'.

An ideal bandpass filter would have a completely flat passband (e.g. with no gain/attenuation throughout) and would completely attenuate all frequencies outside the passband. Additionally, the transition out of the passband would be instantaneous in frequency. In practice, no bandpass filter is ideal. The filter does not attenuate all frequencies outside the desired frequency range completely; in particular, there is a region just outside the intended passband where frequencies are attenuated, but not rejected. This is known as the filter roll-off, and it is usually expressed in dB of attenuation per octave or decade of frequency. Generally, the design of a filter seeks to make the roll-off as narrow as possible, thus allowing the filter to perform as close as possible to its intended design. Often, this is achieved at the expense of pass-band or stop-band ripple.

The bandwidth of the filter is simply the difference between the upper and lower cutoff frequencies. The shape factor is the ratio of bandwidths measured using two different attenuation values to determine the cutoff frequency, e.g., a shape factor of 2:1 at 30/3 dB means the bandwidth measured between frequencies at 30 dB attenuation is twice that measured between frequencies at 3 dB attenuation.

Outside of electronics and signal processing, one example of the use of band-pass filters is in the atmospheric sciences. It is common to band-pass filter recent meteorological data with a period range of, for example, 3 to 10 days, so that only cyclones remain as fluctuations in the data fields.

In neuroscience, visual cortical simple cells were first shown by David Hubel and Torsten Wiesel to have response properties that resemble Gabor filters, which are band-pass.[2]

Làm blog của Google không cần có tài khoản Gmail

Làm blog của Google không cần có Gmail

Để tham gia viết bài hoặc làm chủ một trang blog trên dịch vụ của Google thật dễ, chỉ sau vài bước thao tác trong thời gian chưa đầy 5 phút, là bạn đã là một blogger, có tên và tài khoản riêng.

Nếu bạn chưa có tài khoản Google, đầu tiên bạn vào trang web http://www.blogger.com - rồi tạo một tài khoản blogger bằng chính địa chỉ e-mail hiện có (không nhất thiết phải là Gmail). Sau khi thành công, bạn tiếp tục lập mới một Blog với tên và địa chỉ web riêng, đồng thời có thể mời tối đa đến 100 người tham gia viết bài hoặc cùng làm chủ Blog đó của mình.

Trường hợp có một chủ trang blog mời bạn tham gia viết bài, trước tiên bạn sẽ nhận được một e-mail "thư mời đóng góp cho blog". Sau khi bấm vào đường dẫn trong thư mời (hoặc copy địa chỉ đường dẫn và dán lên ô địa chỉ của trình duyệt internet, gõ tiếp Enter), một cửa sổ giống như sau sẽ hiện ra, với người chưa có tài khoản Google *, hãy bấm vào "Tạo tài khoản ngay bây giờ":

* Nếu trước đây bạn đã có tài khoản Google: chỉ việc điền ngay các dữ liệu tương ứng của bạn vào các ô "Tên người dùng (Email)" và ô "Mật khẩu", rồi bấm "Chấp nhận lời mời".

Dưới đây là các hướng dẫn tiếp cho người chưa có tài khoản Google:

Trình duyệt sẽ chuyển sang cửa sổ "Tạo tài khoản Google". Hãy điền chính xác địa chỉ e-mail của mình vào ô tương ứng, sau đó gõ mật khẩu mong muốn của mình dành cho blog vào (để ý dòng chữ bên dưới ô nhập mật khẩu, đó là Google hướng dẫn cho bạn độ mạnh của mật khẩu, mật khẩu dài và rắc rối thì càng mạnh). Tại ô "Tên hiển thị", hãy gõ tên của mình vào (tên này sẽ hiển thị tại các các bài viết của bạn sau này). Tiếp theo, gõ những chữ màu in nghiêng xiên xẹo bạn nhìn thấy vào ô "Xác minh từ" (ở trong hình dưới là các chữ: taltab ), rồi đánh dấu vào ô "Tôi chấp thuận các điều khoản dịch vụ" và bấm vào ô "Tiếp tục" có màu da cam:

(Trong trường hợp bạn gõ sai hoặc thiếu gì đó, sau khi bấm "Tiếp tục", Google sẽ có các chỉ dẫn để bạn làm lại ngay).

Bây giờ, ở cửa sổ này, bạn chỉ cần điền lại địa chỉ e-mail của mình và mật khẩu vừa được tạo ở trên, bấm vào "Chấp nhận lời mời" là xong. Bạn đã là một blogger chính hiệu để có thể viết bài cùng với chủ blog, hoặc lập cho mình vài blog mới:

Chúc các bạn nhiệt tình san sẻ với cộng đồng và vui vẻ với blog!

Đăng kí Blog lên google

Đăng kí blog lên Google

Khi làm một blog bạn muốn nhiều người vào xem ! Nhưng lại không có nhiều bạn ! Và bạn muốn đưa blog của mình lên các công cụ tìm kiếm như Google.com để có thêm nhiều người vào tham quan. Vậy bạn hãy vào website

http://www.google.com/addurl/

Sau khi vào trang web trên, bạn kéo thanh trượt xuống phía dưới, đến ô URL. Bạn nhập địa chỉ blog cần đăng lên vào ô Add URL. Ghi tiêu đề cho phần bạn đăng lên trong ô Comments. Nhập đoạn mã màu xanh vào ô bên dưới. Sau đó click vào Add URL.


Sau khi đăng kí thành công bạn sẻ thấy một xác nhận thành công(phần đánh dấu đỏ) đại loại như là:
Thank you

Your site URL has been successfully added to our list of URLs to crawl. Please note that we do not add all submitted URLs to our index, and we cannot make any predictions or guarantees about when or if they will appear.

You may also be interested in Google webmaster tools, which shows you Google's view of your site, helps you diagnose problems, and lets you share information with us to help improve your site's visibility in our search results

Want to do more?


Reach more prospects Earn more from your website Showcase your products for free


Google AdWords advertising allows you to create your own targeted ads. With cost-per-click pricing you decide how much to spend and you only pay when people click on your ad.

Start reaching more prospects with Google AdWords.

Google AdSense delivers Google ads that are relevant to the content on your pages. Earn advertising revenue with minimal effort and no additional cost.

Earn money from your website with Google AdSense.

Google Product Search is Google's shopping search engine. Learn more about Google Product Search, and how you can take advantage of free product listings.

Attract online shoppers with Google Product Search.


Chúc các bạn sẽ có thêm nhiều bạn mới qua trang blog của bạn nhé !!!

:cheers: :cheers: :cheers: :cheers: :cheers:

Thứ Ba, 13 tháng 10, 2009

Thử nghiệm 2(hinh ý kiến bản thân)


     "Xin chào mọi người tôi rất vui khi mọi người tới thăm trang Blog của tui(Lê viết vĩnh).Tui chuẩn bị xây dựng diễn đàn cho học tập CCNA và các môn học kì 9"


Thử nghiệm

Bạn thấy blog của tui thế nào?

View Results
Create a Blog Poll

Các hiệu ứng đẹp Led...


I made this widget at MyFlashFetish.com.


I made this widget at MyFlashFetish.com.


I made this widget at MyFlashFetish.com.


MySpace Music Player/Playlist (Flash MP3 Players) and Widgets - MyFlashFetish.com

MySpace Music Player/Playlist (Flash MP3 Players) and Widgets - MyFlashFetish.com

Shared via AddThis

Thứ Hai, 12 tháng 10, 2009

5>Thưởng thức thư viện nhạc nền

Nhạc nền

4>Messenger Pingbox Chat

3>Tất cả những gì bạn cần khi đến với Nha Trang


2>Cảnh đẹp Việt Nam


6>Album nhạc tự tạo1


MusicPlaylistRingtones
Create a playlist at MixPod.com

Chủ Nhật, 11 tháng 10, 2009

1>Slide Show của tôi đấy.


Thứ Năm, 8 tháng 10, 2009

2>Phần này dành cho đồ án thông tin di động.

3>Những điều cần làm với chiếc máy tính của người bận rộn.


Sưu tầm và soạn thảo:Lê viết vĩnh
Vấn đề đa số các bạn dùng máy tính thường gặp phải là cài đặt lại phần mềm cho máy tính của mình, một công việc chẳng thú vị gì mấy đối với những người bận rộn. Tuy nhiên, điều đơn giản nhất để tránh sự nhàm chán đó là dùng chương trình Ghost để sao lưu (backup) lại ổ cứng của bạn ở tình trạng tốt nhất và sau khi bị sự cố thì ta chỉ cần phục hồi (restore) lại là xong ngay.Nếu vấn đề chỉ đơn giản là vậy thì tôi cũng chẳng viết bài này làm gì! Thế nhưng khi bạn nâng cấp máy mới với một mainboard khác và bạn vẫn muốn giữ lại bộ Windows XP cũ của mình thì vấn đề lại xảy ra nếu mainboard cũ và mới không giống nhau. Để giải quyết vấn đề này ta làm như sau:Có hai cách để tạo một bộ GHOST ( *GHO) dành cho tất cả các mainboard.-Thứ nhất là là dùng phần mềm DEPLOYDung lượng 1.70MB
http://files.myopera.com/letsgo/files/DEPLOY.zip- Cách hai đó là sử dụng tập tin có sẵn trong windows và đăng ký registy là xong!Click vào readmore để đọc cách làm!Cách thứ nhất! ( hình ảnh)
Click this bar to view the full image.
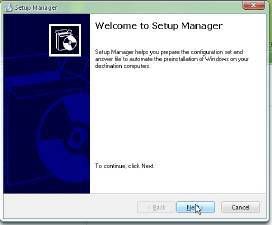
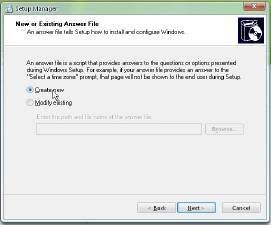
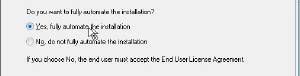
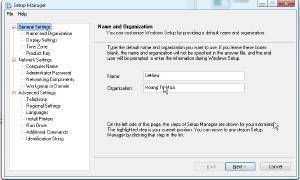
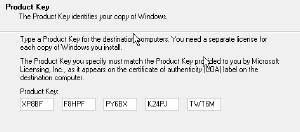
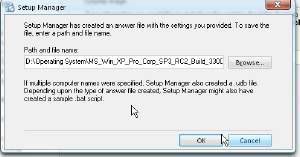
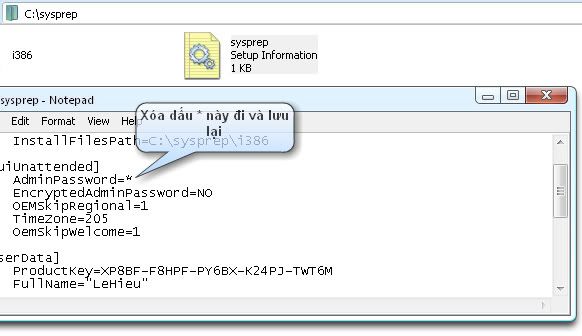
( lý thuyết)A) Bước 1 : bạn phải chuẩn bị cho bước này thật đúng như sau:1) Bạn phải chuẩn bị làm ở trên máy đơn giản chỉ xài sound và card màn hình on board. Cài XP fresh với CD installed XPSP2 trên một ổ C format qua NTFS( cần bảo vệ mật nhưng thường không cần thiết ) hay FAT 32 tuỳ ý( nhưng dùng FAT 32 cứu hộ sau này bằng ghost sau này ở môi trường DOS rõ ràng dễ hơn.2) Sau khi cài xong XP( chưa cài đặt thêm driver nào cả) , vào trong XP đầu tiên mới dùng đĩa cài đặt XP tìm ra thư mục SUPPORT\TOOLS để ồ giải nén toàn bộ file deploy.cab ra thư mục SYSPREP ở C có XP.3) Trong thư mục Sysprep này, ta sẽ tìm ra file setupmgr.exe chạy nhằm tạo ra tạo ra tập tin giúp cài XP tự động sau này ( unattended ) . ấn next và ở mục Create a new answer file, chúng ta sẽ chọn mục 2 Sysprep setup.ở product , chọn bản XP professional và ở phần License Agreement screen chọn No, do not fully automate the installation, ấn next..4) Bây giờ nó yêu cầu bạn điền mọi thông tin cho nó biết. Lưu ý ở các phần:a) General settings :- Name and organization, phần name để trống( dành cho Sysprep làm việc sau này),- Organization: home. Aán next.- ở Display settings: chọn 3 mục vào Use windows defaults,- Time zone: nên chọn vào GMT+7 Hanoi Djakarta .- Product Key: Điền các ô CD key hợp lệ cho XPSP2 .b) ở Network settings :- Computer Name chọn nút kiểm Automatically generated computer name- Administrator: chọn nút kiểm prompt the end user for administrator password- Networks components chọn vào Typical settings- Workgroup : chọn vào Workgroup .c) Advanced settings:- Telephone: Country Vietnam, các ô khác để trống.- Regional setting: Chọn vào use the default regional setting- Các mục còn lại của Advanced settings như install printer, run one, Additional commands và Indentification string, ấn next để bỏ ra5) Một cửa sổ sau cùng hiện ra, hỏi chúng ta muốn lưu ở đâu: file sysprep.inf ở ổồ C :\SYSPREP và ấn OK.6) ở cửa sổ setup manager, chọn file và exit. Thoát khỏi chương trình.B ) Bước 2 : Không phải là để đĩa CD có Ghost vào mà bắt đầu trong XP chạy sysprep.exe trong thư mục C:\SYSPREP1) ở cứa sổ đầu tiên System Preparation Tool, chọn vào nút kiểm Minisetup, Don?t regenerate security indentifier và Detect non plug and play . Trong mục shutdown mode chọn Reboot và ấn vào bên phải nút Reseal .b) Sysprep bắt đầu chuẩn bị mọi thứ cho việc chạy minisetup và cập nhật driver sau này. Reboot máy lại.3) Bước 3: Bây giờ mới chọn first boot device CDROM và để đĩa CD có ghost như Hiren 80 vào mà bắt đầu làm file ghost để chạy cho nhiều máy. Khi để vào máy khác bằng ghost này nhờ có Syspsprep.inf và cấu hình chạy minisetup sẳn nó sẽ tạo lập XP theo cấu hình mới theo như mong muốn. Có điều bạn phải thủ sẳn đĩa cài đặt WìnXPSP vì chắc chắn nó sẽ hỏi đĩa này ở đâu để cập nhật lại mọi driver của phần cứng.Chú ý: tại dấu nhắc R:\ bạn gõ chỉ cần gõ ghost -Z9(R:\ghost -z9) . Cuối cùng chọn thư mục lưu file ghost đó! Xong cách 1-Cách hai!Cách này khá đơn giản hơn nhiều.Bước 1: Cài đặt windows XP và tất cả chương trình cần thiết.Bước 2: Vào thư mục C:\WINDOWS\Driver Cache\i386, mở file Driver.cab rồi trích (Extract) 4 tập tin Atapi.sys, Intelide.sys, Pciide.sys, và Pciidex.sys vào thư mục C:\WINDOWS\System32\drivers.Bước 3: Tạo tập tin tên Mergeide.reg bằng Notepad với nội dung như sau:Windows Registry Editor Version 5.00[HKEY_LOCAL_MACHINE\SYSTEM\CurrentControlSet\Contro l\CriticalDeviceDatabase\primary_ide_channel]"ClassGUID"="{4D36E96A-E325-11CE-BFC1-08002BE10318}""Service"="atapi"[HKEY_LOCAL_MACHINE\SYSTEM\CurrentControlSet\Contro l\CriticalDeviceDatabase\secondary_ide_channel]"ClassGUID"="{4D36E96A-E325-11CE-BFC1-08002BE10318}""Service"="atapi"[HKEY_LOCAL_MACHINE\SYSTEM\CurrentControlSet\Contro l\CriticalDeviceDatabase\*pnp0600]"ClassGUID"="{4D36E96A-E325-11CE-BFC1-08002BE10318}""Service"="atapi"[HKEY_LOCAL_MACHINE\SYSTEM\CurrentControlSet\Contro l\CriticalDeviceDatabase\*azt0502]"ClassGUID"="{4D36E96A-E325-11CE-BFC1-08002BE10318}""Service"="atapi"[HKEY_LOCAL_MACHINE\SYSTEM\CurrentControlSet\Contro l\CriticalDeviceDatabase\gendisk]"ClassGUID"="{4D36E967-E325-11CE-BFC1-08002BE10318}""Service"="disk"[HKEY_LOCAL_MACHINE\SYSTEM\CurrentControlSet\Contro l\CriticalDeviceDatabase\pci#cc_0101]"ClassGUID"="{4D36E96A-E325-11CE-BFC1-08002BE10318}""Service"="pciide"[HKEY_LOCAL_MACHINE\SYSTEM\CurrentControlSet\Contro l\CriticalDeviceDatabase\pci#ven_0e11&dev_ae33]"ClassGUID"="{4D36E96A-E325-11CE-BFC1-08002BE10318}""Service"="pciide"[HKEY_LOCAL_MACHINE\SYSTEM\CurrentControlSet\Contro l\CriticalDeviceDatabase\pci#ven_1039&dev_0601]"ClassGUID"="{4D36E96A-E325-11CE-BFC1-08002BE10318}""Service"="pciide"[HKEY_LOCAL_MACHINE\SYSTEM\CurrentControlSet\Contro l\CriticalDeviceDatabase\pci#ven_1039&dev_5513]"ClassGUID"="{4D36E96A-E325-11CE-BFC1-08002BE10318}""Service"="pciide"[HKEY_LOCAL_MACHINE\SYSTEM\CurrentControlSet\Contro l\CriticalDeviceDatabase\pci#ven_1042&dev_1000]"ClassGUID"="{4D36E96A-E325-11CE-BFC1-08002BE10318}""Service"="pciide"[HKEY_LOCAL_MACHINE\SYSTEM\CurrentControlSet\Contro l\CriticalDeviceDatabase\pci#ven_105a&dev_4d33]"ClassGUID"="{4D36E96A-E325-11CE-BFC1-08002BE10318}""Service"="pciide"[HKEY_LOCAL_MACHINE\SYSTEM\CurrentControlSet\Contro l\CriticalDeviceDatabase\pci#ven_1095&dev_0640]"ClassGUID"="{4D36E96A-E325-11CE-BFC1-08002BE10318}""Service"="pciide"[HKEY_LOCAL_MACHINE\SYSTEM\CurrentControlSet\Contro l\CriticalDeviceDatabase\pci#ven_1095&dev_0646]"ClassGUID"="{4D36E96A-E325-11CE-BFC1-08002BE10318}""Service"="pciide"[HKEY_LOCAL_MACHINE\SYSTEM\CurrentControlSet\Contro l\CriticalDeviceDatabase\pci#ven_1095&dev_0646&REV _0 5]"ClassGUID"="{4D36E96A-E325-11CE-BFC1-08002BE10318}""Service"="pciide"[HKEY_LOCAL_MACHINE\SYSTEM\CurrentControlSet\Contro l\CriticalDeviceDatabase\pci#ven_1095&dev_0646&REV _0 7]"ClassGUID"="{4D36E96A-E325-11CE-BFC1-08002BE10318}""Service"="pciide"[HKEY_LOCAL_MACHINE\SYSTEM\CurrentControlSet\Contro l\CriticalDeviceDatabase\pci#ven_1095&dev_0648]"ClassGUID"="{4D36E96A-E325-11CE-BFC1-08002BE10318}""Service"="pciide"[HKEY_LOCAL_MACHINE\SYSTEM\CurrentControlSet\Contro l\CriticalDeviceDatabase\pci#ven_1095&dev_0649]"ClassGUID"="{4D36E96A-E325-11CE-BFC1-08002BE10318}""Service"="pciide"[HKEY_LOCAL_MACHINE\SYSTEM\CurrentControlSet\Contro l\CriticalDeviceDatabase\pci#ven_1097&dev_0038]"ClassGUID"="{4D36E96A-E325-11CE-BFC1-08002BE10318}""Service"="pciide"[HKEY_LOCAL_MACHINE\SYSTEM\CurrentControlSet\Contro l\CriticalDeviceDatabase\pci#ven_10ad&dev_0001]"ClassGUID"="{4D36E96A-E325-11CE-BFC1-08002BE10318}""Service"="pciide"[HKEY_LOCAL_MACHINE\SYSTEM\CurrentControlSet\Contro l\CriticalDeviceDatabase\pci#ven_10ad&dev_0150]"ClassGUID"="{4D36E96A-E325-11CE-BFC1-08002BE10318}""Service"="pciide"[HKEY_LOCAL_MACHINE\SYSTEM\CurrentControlSet\Contro l\CriticalDeviceDatabase\pci#ven_10b9&dev_5215]"ClassGUID"="{4D36E96A-E325-11CE-BFC1-08002BE10318}""Service"="pciide"[HKEY_LOCAL_MACHINE\SYSTEM\CurrentControlSet\Contro l\CriticalDeviceDatabase\pci#ven_10b9&dev_5219]"ClassGUID"="{4D36E96A-E325-11CE-BFC1-08002BE10318}""Service"="pciide"[HKEY_LOCAL_MACHINE\SYSTEM\CurrentControlSet\Contro l\CriticalDeviceDatabase\pci#ven_10b9&dev_5229]"ClassGUID"="{4D36E96A-E325-11CE-BFC1-08002BE10318}""Service"="pciide"[HKEY_LOCAL_MACHINE\SYSTEM\CurrentControlSet\Contro l\CriticalDeviceDatabase\pci#ven_1106&dev_0571]"Service"="pciide""ClassGUID"="{4D36E96A-E325-11CE-BFC1-08002BE10318}"[HKEY_LOCAL_MACHINE\SYSTEM\CurrentControlSet\Contro l\CriticalDeviceDatabase\pci#ven_8086&dev_1222]"ClassGUID"="{4D36E96A-E325-11CE-BFC1-08002BE10318}""Service"="intelide"[HKEY_LOCAL_MACHINE\SYSTEM\CurrentControlSet\Contro l\CriticalDeviceDatabase\pci#ven_8086&dev_1230]"ClassGUID"="{4D36E96A-E325-11CE-BFC1-08002BE10318}""Service"="intelide"[HKEY_LOCAL_MACHINE\SYSTEM\CurrentControlSet\Contro l\CriticalDeviceDatabase\pci#ven_8086&dev_2411]"ClassGUID"="{4D36E96A-E325-11CE-BFC1-08002BE10318}""Service"="intelide"[HKEY_LOCAL_MACHINE\SYSTEM\CurrentControlSet\Contro l\CriticalDeviceDatabase\pci#ven_8086&dev_2421]"ClassGUID"="{4D36E96A-E325-11CE-BFC1-08002BE10318}""Service"="intelide"[HKEY_LOCAL_MACHINE\SYSTEM\CurrentControlSet\Contro l\CriticalDeviceDatabase\pci#ven_8086&dev_7010]"ClassGUID"="{4D36E96A-E325-11CE-BFC1-08002BE10318}""Service"="intelide"[HKEY_LOCAL_MACHINE\SYSTEM\CurrentControlSet\Contro l\CriticalDeviceDatabase\pci#ven_8086&dev_7111]"ClassGUID"="{4D36E96A-E325-11CE-BFC1-08002BE10318}""Service"="intelide"[HKEY_LOCAL_MACHINE\SYSTEM\CurrentControlSet\Contro l\CriticalDeviceDatabase\pci#ven_8086&dev_7199]"ClassGUID"="{4D36E96A-E325-11CE-BFC1-08002BE10318}""Service"="intelide";Add driver for Atapi (requires Atapi.sys in Drivers directory)[HKEY_LOCAL_MACHINE\SYSTEM\CurrentControlSet\Servic es\atapi]"ErrorControl"=dword:00000001"Group"="SCSI miniport""Start"=dword:00000000"Tag"=dword:0000001 9"Type"=dword:00000001"DisplayName"="Standard IDE/ESDI Hard Disk Controller""ImagePath"=hex(2):53,00,79,00,73,00,74 ,00,65,00,6 d,00,33,00,32,00,5c,00,44,00,\52,00,49,00,56,00,45 ,00,52,00,53,00,5c,00,61,00,74 ,00,61,00,70,00,69,00,2e,\00,73,00,79,00,73,00,00, 00;Add driver for intelide (requires intelide.sys in drivers directory)[HKEY_LOCAL_MACHINE\SYSTEM\CurrentControlSet\Servic es\IntelIde]"ErrorControl"=dword:00000001"Group"="System Bus Extender""Start"=dword:00000000"Tag"=dword:0000000 4"Type"=dword:00000001"ImagePath"=hex(2):53,00,79, 00,73,00,74,00,65,00,6 d,00,33,00,32,00,5c,00,44,00,\52,00,49,00,56,00,45 ,00,52,00,53,00,5c,00,69,00,6e ,00,74,00,65,00,6c,00,69,\00,64,00,65,00,2e,00,73, 00,79,00,73,00,00,00;Add driver for Pciide (requires Pciide.sys and Pciidex.sys in Drivers directory)[HKEY_LOCAL_MACHINE\SYSTEM\CurrentControlSet\Servic es\PCIIde]"ErrorControl"=dword:00000001"Group"="System Bus Extender""Start"=dword:00000000"Tag"=dword:0000000 3"Type"=dword:00000001"ImagePath"=hex(2):53,00,79, 00,73,00,74,00,65,00,6 d,00,33,00,32,00,5c,00,44,00,\52,00,49,00,56,00,45 ,00,52,00,53,00,5c,00,70,00,63 ,00,69,00,69,00,64,00,65,\00,2e,00,73,00,79,00,73, 00,00,00Hoặc tải cái này về giải nén ra và Merge nó là được!
http://files.myopera.com/letsgo/blog/Mergeide.zipBước 4: Bây giờ bạn nhấp chuột phải vào tập tin Mergeide.reg và chọn Merge rồi nhấn Yes trong bảng thông báo của Windows.Bước 5: Cuối cùng khởi động lại máy tính và cho chạy chương trình Ghost để tạo tập tin sao lưu. Vậy là bạn có được một bộ backup Windows XP tương thích với rất nhiều mainboard thông dụng rồi đó.Nguồn từ: http://my.opera.com/letsgo/blog/2008...ard-thong-dung

Anh mãi mãi nhớ về em(Thân ái: Lê viết vĩnh)

4>Diễn đàn cho các bạn học CCNA


Tôi đang theo học chứng chỉ CCNA và đã hoàn thành xong 1/4 chặn đường vất vả và lạ lẩm này.Nếu bạn nào có vướng mắc và muốn trao dồi thêm kiến thức về chứng chỉ này thì tui sẻ tận tình hưởng ứng và giúp đỡ trong khả năng của mình.Rất mong sự nhiệt tình của các bạn để chúng ta dần dần lỉnh ngộ được công nghệ nha các bạn.


Lần sau viết nhiều hơn nữa......


Tìm kiếm

Sở thích khác:

Lê Viết VĩnhLê Viết VĩnhLê Viết VĩnhLê Viết Vĩnh Lê Viết Vĩnh Lê Viết Vĩnh Lê Viết Vĩnh Lê Viết Vĩnh Lê Viết Vĩnh Lê Viết Vĩnh Lê Viết Vĩnh Lê Viết Vĩnh Lê Viết Vĩnh Lê Viết VĩnhLê Viết Vĩnh Lê Viết Vĩnh Lê Viết Vĩnh Lê Viết Vĩnh
Điện tử viễn thôngĐiện tử viễn thôngĐiện tử viễn thôngĐiện tử viễn thông Điện tử viễn thông Điện tử viễn thôngĐiện tử viễn thôngĐiện tử viễn thôngĐiện tử viễn thôngĐiện tử viễn thôngĐiện tử viễn thôngĐiện tử viễn thôngĐiện tử viễn thôngĐiện tử viễn thôngĐiện tử viễn thôngĐiện tử viễn thôngĐiện tử viễn thôngĐiện tử viễn thông